Ringtone is an original musical instrument featuring a circular body, capacitive touch controls, and a minimal LED user interface. I conceptualized and assembled Ringtone in Spring 2020 as my final project for the MIT class Digital Musical Instrument Design (21M.370).
Performing with Ringtone. (0:48)
The Instrument
Ringtone's body consists of a 7.5" diameter plate constructed from plastic takeout lids. Lining the inside edge of the plate is a strip of 32 LEDs, and along the outside edge are 12 capacitive touch sensors cut from copper tape. The 12 touch sensors form two sets: 8 "note" sensors on the right hand side, and 4 "button" sensors on the left.
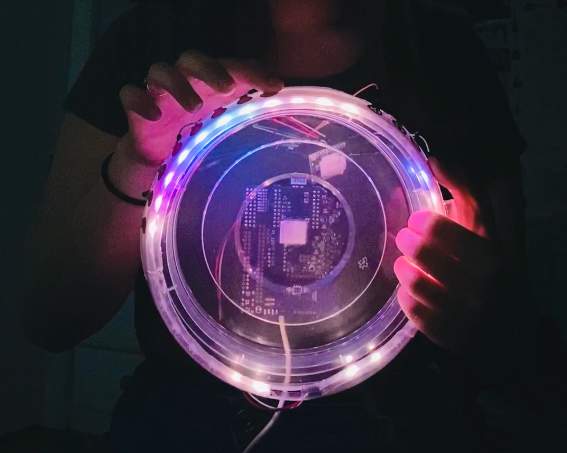
Attached to the back is the 21M.370 class PCB, an ESP32 microcontroller, and an IMU, which collects XYZ acceleration and gyro data. The ESP32 connects via USB to a computer (not pictured), where the instrument's sound is generated.

A diagram of Ringtone.


left: B, -, +, and K buttons. right: 8 “note” touch sensors, mapped to pitches configured in software.

Back of Ringtone.
Playing Ringtone
To play Ringtone, simply press the 8 note sensors as you would keys on a piano. Pressing a sensor starts its note, and releasing the sensor stops the note.

Play Ringtone's note sensors like piano keys.
Ringtone also has two special features to enhance expressiveness while playing: tone control and an octavized bass note.
Tilt to Tweak Tone: You can tweak the tone and volume of Ringtone's sound by tilting the instrument in 3 axes as you play notes. This alters the blend of Ringtone's oscillators (see Sound Generation in Pd for more details).
Octavized/Bass Note: If you hold the [B] button, Ringtone will octavize the next note you play by also triggering the note an octave below it. The higher note will stop when you let go of the note sensor, as usual, but the lower note won't stop until you let go of the [B] button. One octave is a limited range, so this feature is useful for adding bass notes to achieve a fuller sound.

Two features while playing Ringtone.
Configuring Ringtone
By default, Ringtone is set to the key of C, and the 8 note sensors are mapped to the major scale: C4, D4, E4, F4, G4, A4, B4, and C5. You can configure the offset, key, octave, and scale of this pitch mapping using different combinations of the button sensors.
Rolling the Scale: Press the [+] or [-] buttons to roll the scale to the left or right, respectively. This offsets each note sensor's position in the scale. For example, pressing [+] would scroll the C major scale to the left, resulting in D4, E4, F4, G4, A4, B4, C5, and D5.
Changing the Key: While holding the [K] button, press the [+] or [-] buttons to transpose to a higher or lower key, in semitone increments. For example, holding [K] and pressing [+] would transpose the C major scale to C#/Db major, resulting in Db4, Eb4, F4, Gb4, Ab4, B4, Cb5, and Db5.
Changing the Octave: While holding the [B] button, press the [+] or [-] buttons to transpose to a higher or lower octave. For example, holding [B] and pressing [+] would transpose the default C major scale up an octave, from starting at C4 to starting at C5.
Shake to Cycle Between Scales: Shake Ringtone to cycle through a list of different scales. The available scales are major, blues, natural minor, harmonic minor, and melodic minor.
Designing Visual Feedback
While configuring Ringtone, it can get difficult to keep track of what pitch mapping you have. Without feedback, it's also hard to tell if your actions have been recognized or if your desired changes have been made. To solve this, I designed a minimal LED-based interface to help you visualize the pitch mappings as you change them.
Each of the 12 touch sensors are positioned directly above an LED. The note sensor LEDs are color-coded to indicate what pitches they are assigned. The button sensor LEDs are off by default and light up when the corresponding buttons are pressed. Together, these LEDs provide a visual representation of state and great visual feedback for user actions:
- When you roll the scale, you see all the colors shift down one position.
- When you change the octave, all the colors become brighter or dimmer.
- When you change the key, the colors change to reflect the new pitches.
- When you shake Ringtone, all the LEDs briefly flash white to show that the shake gesture has been recognized, and the color palette changes to reflect the new scale.
- When you press/release a button sensor, its LED turns on/off to show that Ringtone has registered the press or release.
The 20 LEDs that are not linked to touch sensors take on the color of the current key and run an infinite LED train animation.
How It Works
Ringtone's I/O Chain
Ringtone is built on top of the I/O chain that we used for 21M.370 class assignments, which includes 3 components: ESP32 code, Python code, and a Pd patch.

Ringtone's I/O chain
The ESP32 code (C++) collects input from the touch sensors and the IMU, and it sends output to the LED strip. The ESP32 communicates with Python via USB serial.
The Python code takes sensor data from the ESP32 and processes it. It then uses the data to perform various actions, such as changing the pitch mapping (see State Machine) and updating the LEDs (see LED User Interface). Python then forwards the processed touch and IMU data, as well as musical parameters like MIDI pitches, to the Pd patch via OSC.
The Pd patch accepts values from Python and uses them to synthesize Ringtone's audio output.
State Machine (Python)
Ringtone's primary logic is implemented in Python as four modes of operation, or states 0-3. Ringtone begins in State 0 (Play Mode) and switches between states based on which buttons are pressed or released. The states are described below:
- 0: Play Mode, the default mode in which the group of 8 note sensors trigger notes to play, and the +/- buttons “roll” the pitches over by one spot in the scale.
- 1: Bass Select Mode, entered when the B button is held down. In this mode, the performer assigns a pitch to the B button. Pressing any of the 8 note sensors in this mode causes two notes to play: the normal note, and one octave below that note. The higher note turns off when the note is released, and the lower note turns off when the B button is released.
- 2: Key Select Mode, entered when the K button is held down. In this mode, +/- buttons increment and decrement the key, and shaking the instrument cycles between possible key options: major, blues, natural minor, harmonic minor, and melodic minor.
- 3: Octave Select Mode, entered when both K and B buttons are held down. In this mode, +/- buttons roll the scale up or down an octave.
* handled in Pd
0 - PLAY MODE
    8 down/up:  note on/off*
    B up:       note off (8va), clear bass pitch
    + down:     roll +1 scale degree
    - down:     roll -1 scale degree
    B down:     enter bass select mode (1)
    K down:     enter key select mode (2)
1 - BASS SELECT MODE (B down)
    8 down:     change bass pitch, note on (8vb)*, enter play mode (0)
    B up:       note off (8vb)*, clear bass pitch, enter play mode (0)
    K down:     enter octave select mode (3)
2 - KEY SELECT MODE (K down)
    8 down/up:  note on/off*
    + down:     increase key 1 semitone
    - down:     decrease key 1 semitone
    shake:      change scale (major/minor, etc.)
    K up:       enter play mode (0)
    B down:     enter octave select mode (3)
3 - OCTAVE SELECT MODE (K and B down)
    8 down/up:  note on/off*
    + down:     roll +1 octave
    - down:     roll -1 octave
    K up:       enter bass select mode (1)
    B up:       enter key select mode (2)
LED User Interface (Python)
To create the LED UI color coding, I mapped pitch to color in the HSV (Hue, Saturation, Value) color space. The pitch class (0-12, calculated by MIDI pitch mod 12) corresponds to evenly spaced hues between 0º to 360º. The octave is then mapped to saturation, and the value is fixed. I then converted the color from HSV space to RGB space to send to the LED strip.
As the player changes Ringtone's pitches, Python regularly recalculates the LED colors and sends them to the ESP32 to output to the LED strips. Python also responds to press and release events from the button sensors, turning the corresponding LEDs on and off when they are pressed and released.

Pitch class to hue mapping in Ringtone.
Sound Generation in Pd
In the final step of the I/O chain, a Pd patch collects values from Python via OSC to synthesize Ringtone's output audio.
Ringtone listens at these OSC addresses: /pitchX for the 8 note pitches, /capstateX for the 8 note sensor states, /basspitch and /bassnote for the bass note, /gyro for XYZ rotational positions, and /accel for XYZ accelerations.

OSC inputs to Pd.
There are 9 subpatches, one for handling each of the 8 notes, and one for the bass note. The outputs of these subpatches are fed through a low pass filter, a graphic EQ, and then a reverb and stereo delay module before they reach the mixer, which outputs the audio to the computer speakers.

Ringtone's main Pd patch.
In each subpatch, there are 3 basic oscillators from Automatonism — one saw, one sine, and one triangle — each with their own Wavefold and VCA modules. The fold parameter and VCA gain parameter are controlled by the gyro X, Y, and Z values, so that tilting and rotating Ringtone will blend between different waveforms and change the tone. Each note’s onset and release are controlled by an ADSR envelope and the state of the capacitive touch sensors.
The relatively long sustain and release in the ADSR envelope, plus plenty of reverb and delay at the end of the chain, create Ringtone's "dreamy" sound.

Inside each Pd subpatch.
Design Evaluation
After performing with Ringtone, I identified the features I found the most useful, as well as a number of areas for improvement.
- Key Transposing: As a singer, I appreciate the key transposing feature. With just a few taps, I can touch the same sensors as before and have the sound come out in a lower or higher key. This is a huge plus coming from piano, where playing in a different key requires pressing different keys.
- LED Visual Feedback: The LED visual feedback was useful, especially for button presses. I very much relied on the LEDs to tell which operation mode I was in.
- Sensor Placement: My button placement was mostly successful. My right hand felt comfortable reaching the 8 note sensors. I placed the
[B]button right where my left thumb would naturally fall, which made it easier to press during a performance — and I ended up utilizing the[B]button very often. However, the[+],[-], and[K]buttons were a bit out of the way for my left hand. Maybe if I positioned them differently, I could take advantage of their functions and be able to play a greater variety of pitches during a performance. I also thought about a version of Ringtone for left-handed players. - Limitations of Capacitive Touch: I learned that capacitive touch sensors are slow to react and not the most reliable, making Ringtone unsuitable for playing quicker notes or tight rhythms. Unlike piano keys, they're also insensitive to pressure, leaving minimal room for dynamics. A future direction to explore would be expanding Ringtone's rhythmic and dynamic capabilities. Perhaps rhythm can be derived from gyroscope or accelerometer sensor data, or the addition of another non-capacitive touch sensor could provide more freedom for rhythmic expression.
- Build Quality: Lastly, I would improve Ringtone's build quality by using wires instead of jumper cables and something sturdier than plastic takeout lids for a body (though I'm pretty proud of what I could pull off at home during lockdown.)
Reflection
I’m delighted with Ringtone as an instrument! I had lots of fun both making it and performing with it. Through this project, I learned a great deal about music technology, electronics, and interaction design. 21M.370 was my first venture into instrument design, and I was amazed by the sheer breadth of the field. I hope I'll get more opportunities to explore this area in the future.
Back of Ringtone.
| tags | Electronics · Interaction Design · Music Technology |
| technologies | Arduino · ESP32 · LED strip · Puredata · Python · OSC |
| materials & tools | Plastic takeout lid · copper tape · jumper cables |
| context | MIT 21M.370 Digital Instrument Design |
| completed | May 2020 |