"I named this chair after how I felt while making it," I told the class during my final presentation. I got a few chuckles. "Hey, it's true!"
After taking Toy Product Design (2.00B), I realized I enjoyed hands-on projects and decided to try more classes that involve physical design and fabrication. My sophomore fall, I enrolled in my first studio class, Design Studio: Objects and Interaction (4.031). The class wasted no time. I had never picked up a saw in my life, but the second week of the semester, I was already trained and spending hours at a time in the woodshop.
Rule-Based Design
In the first unit of the semester, we learned about rule-based design through Sol Lewitt's conditional wall drawings. Rather than creating the final works directly, Lewitt specified a set of instructions for other artists to follow, such as: Vertical lines, not straight, not touching, covering the wall evenly.
The beauty of this type of design is that each set of instructions can result in many possible works. The instructions you give can either open new possibilities or impose constraints—it takes a bit of imagination to navigate that balance.
Our assignment was to create a set of instructions to construct a chair that fits in a 2' x 2' x 4' volume, and then carry out those instructions.
The instructions you give can either open new possibilities or impose constraints—it takes a bit of imagination to navigate that balance.
Brainstorming


Some early sketches showing ideas I wanted to incorporate in my chair design.


Two potential chair concepts and their corresponding instruction sets.
After letting my mind and pencil run loose with ideas, I selected a concept I called the "negative chair", which was inspired by the look of right angles and negative space in the game Jenga.


Instructions and Rhino model outlines for my "negative chair" concept.
I wrote a first draft of my instruction set, which reads:
Building the Seat
- Pick a whole number between 36 and 144 and multiply it by 1.5
- Cut 1.5"-wide lumber to lengths that are multiples of 1.5", each piece being no shorter than 1.5" and no longer than 18". Continue cutting pieces until the total length cut reaches the number in (1)
- Arrange the pieces as desired, while meeting the following constraints:
- The pieces are contained by a 18"x18" square
- The pieces meet at 90º angles
- All pieces are touching, directly or indirectly
- The pieces all lie on the same plane
- The pieces touch the below layer at 3+ points
- Duplicate the layer just created, and stack the pair so that corresponding pieces are aligned. Stack this pair above the previous pair
- Repeat steps (1) through (4) 12 times
Building the Back
- Pick a whole number between 36 and 144 and multiply it by 3
- Cut 1.5"-wide lumber to lengths that are multiples of 1.5", each piece being no shorter than 1.5" and no longer than 18". Cut 2 pieces of each chosen length and glue each pair together. Continue cutting pieces until the total length cut reaches the number in (6)
- Stack the paired pieces in (7) on one edge of the seat, until there are 12 layers and no more than 9" of empty space on each layer
(I chose to work with pairs of matching layers because I wanted the layers to use cubic units, and we were given 1x2 lumber stock.)
Scale Models
Next, I built scale models using plywood to quickly explore different possible chairs from the same set of instructions.


Checkpoint passed: these chairs look pretty different!
Analysis and Revision

Following the instructions I wrote, I modeled chair layers in Rhino.

A lumber length analysis of my design.
After modeling chair layers in Rhino and calculating that they would require almost 580 feet of lumber (which was much more than I had available, and also very heavy), I realized I needed to go back and scale down my design. Revisiting my instructions, I removed the back of the chair and some layers in the seat, reducing the mass of the chair while preserving the instruction-based nature of the design.
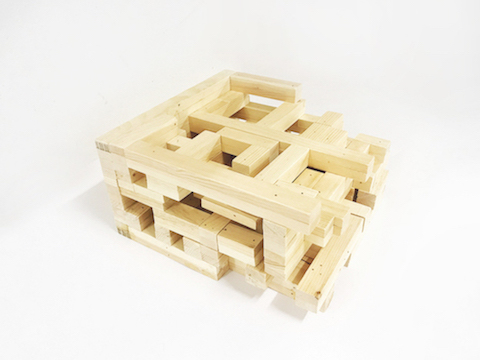
Construction
Building the final chair took approximately 18 hours, including cutting the lumber stock to the correct lengths, clamping the pieces down, nailing them together, carrying the chair from the shop to the studio, and sanding down the edges.


Photo Credit: William Wu
Reflections
I learned that design revisions are important and that woodworking is difficult, especially when you're doing it for first time. But now, I have a nice chair in my dorm room that I can say I designed and built myself!
Final Chair


| tags | Design Studio · Chair Design · Rule-Based Design · Instruction-Based Design |
| technologies | Illustrator · Rhino |
| materials & tools | Lumber · Plywood · Hand Saw · Table Saw · Band Saw · Wood Glue · Nail Gun |
| dimensions | 18" x 18" x 9" |
| context | 4.031 Design Studio: Objects and Interaction |
| completed | October 2017 |